Background
For the better part of the past month, I've been working on migrating my homelab infrastructure to be much more scalable, maintainable, secure, and fault-resistant (look forward to a post on this once the migration is fully complete). One of the security goals I set for this migration was to forward zero ports on my home router.
In the past, I didn't have any problem with opening a few ports on my router for things like HTTP/HTTPS. I only posted my domain (pointing to my router) on trusted or private places, like posting a blog post in my Discord server, or advertising my blog on resumes I'd only hand out privately.
Eventually, the services I wanted to expose changed, most notably with a public-facing media server I host locally. Although I only advertised it in my Discord server, the nature of the service meant that it was more likely to be shared around and more susceptible to landing in the hands of malicious actors, who could easily do a dig to find my home IP.
This is when I decided to switch to Cloudflare. I had already been on the hunt for a new domain registrar for the past while because I wanted wildcard certificates and I somehow came under the impression that Namecheap, the registrar I used at the time, didn't support wildcard certificates (they do, I was just dumb). So I came across Cloudflare, which offered a better price for my domain than Namecheap and offered a free HTTP proxying service on top of that!
Well, color me impressed. I switched right away and posted my domain around much more freely, now that my mind was freed about securing my IP.
Not quite perfect
I had been using Cloudflare for a little while at this point when I decided to host a Minecraft server for my friends. As I was testing connectivity, I realized that the Cloudflare proxy wouldn't work for Minecraft. After all, Cloudflare proxies based on some hostname identification mechanism, and presumably, Minecraft didn't present hostnames, or at least Cloudflare didn't support Minecraft's hostname identification. At the time, I didn't really know of any solutions other than being forced to open a router port and disabling the proxy on a subdomain, which is what I ended up doing.
This has been a thorn in my side for the longest time. Now that my domain was much more widely accessible, there would be a lot more potential malicious actors being able to find my IP. While I did limit open ports on my router as much as I could and realistically, there aren't gonna be that many people targeting me with advanced enough tooling to compromise my network or otherwise cause harm, I knew this was against best practices and it bugged me. But again, I didn't have a good idea of what to do about it.
A while later, I came across ssh's port-forwarding mechanism, where you could open a port locally and have ssh open a port remotely for you and forward the traffic over the SSH tunnel. So for example, if you had a Minecraft server listening locally on 127.0.0.1:25565 and you wanted to open it on a remote port 25566, then you could do something like ssh -R 25566:127.0.0.1:25565 [email protected], allowing you to connect to example.com:25566 and forwarding the traffic to you locally.
ssh -L <local_port>:<remote_ip>:<remote_port> [email protected], which will let you connect to <remote_ip>:<remote_port> via localhost:<local_port> through the SSH tunnel.This is a killer command for managing remote servers.
I was thinking of renting a cheap VPS to forward ports for once I found out about this, but to be frank, I was too lazy and pushed it off until a few months ago, when I felt like my homelab needed a facelift. Given that this feature was so easily available, I wondered if there were any more managed solutions so I didn't have to write system services to establish tunnels myself. Sure enough, I found Fast Reverse Proxy (FRP, for short), which lets you declaratively do remote port-forwarding.
Chaff: How have I never heard of this? It's such an amazing tool for exposing your services securely, and it even comes with a feature to connect STUN clients for P2P connectivity. I searched for FRP on YouTube and only a few videos with only a couple thousand views covering this. Maybe I ought to cover it myself.
So I set up a VPS to test around with FRP and sure enough, it really was as amazing as it looked. Except, of course, that FRP won't preserve true client IPs.
This isn't really FRP's fault. The same "problem" will happen if you do an SSH remote port-forward. In case you don't know what I'm talking about, let's go through an example scenario.
- I have a server running locally on
127.0.0.1:25565, which I'm forwarding to my VPS at101.2.3.4:25565. - Candace, with public IP
201.4.5.6, connects to my VPS on port25565. - FRP/SSH receives packets like
src=201.4.5.6:9879, dst=101.2.3.4:25565and pushes them through the tunnel to me. - The FRP/SSH client I'm running receives the packet and sends a packet to the server, like
src=127.0.0.1:7389, dst=127.0.0.1:25565.
The "problem" is that when the packet reaches my server, the source IP has been NAT'd by FRP/SSH so the server no longer has Candace's public IP, 201.4.5.6.
Most of the time, this doesn't matter. I'd be willing to bet over 90% of game servers (which is my primary use case) would run perfectly fine with the NAT. I can only imagine servers using things like STUN/ICE might run into some problems – and even then, they really shouldn't because STUN/ICE is supposed to solve NAT traversal. The only thing that might be worrying is that a STUN binding with an ICE exchange might end up revealing your public IP over the ICE exchange (realistically, no one's going to be reading ICE exchanges to notice this, of course).
Additionally, the reason I've been quoting "problem" is because this isn't actually a problem. This is intended behavior. To understand why, we have to think about the return trip of a packet.
If Candace's public IP were preserved, my local server would send return packets to 201.4.5.6:9879, completely bypassing FRP/SSH. A packet like src=127.0.0.1:25565, dst=201.4.5.6:9879 would be:
- Routed to my router, with a public IP address of
202.6.7.8. - SNAT'd to something like
src=202.6.7.8:4723, dst=201.4.5.6:9879. - Routed to Candace over the internet.
This would expose my public IP 202.6.7.8 to Candace, but more importantly, Candace is expecting a reply from 101.2.3.4:25565, my VPS address, not from my public IP. As such, even a TCP handshake wouldn't complete if we preserved Candace's IP through the FRP/SSH tunnel to the server. The FRP/SSH NAT isn't actually a problem because it's what allows reversing the traffic to work at all.
No Compromises
Even though an FRP/SSH solution would probably have been fine for me, I wanted to do better, for no better reason than to simply satisfy my intellectual urge on finding out if and how preserving source IPs could be done securely. I didn't want NAT'd source IPs or being forced to open ports on my router to receive source IPs.
I was looking for no compromises.
(Get it? "No compromises" is a double entendre for not reducing my standards and doing it securely so that I wouldn't be compromised. Ha.)
I'd say my knowledge and practical skills in computer networking has become fairly mature for my age, but one of the things I'd always been afraid of touching was Linux iptables.
Playing around with networking for many years, I've seen iptables commands here and there on StackOverflow and other forums as I was looking for solutions to networking problems, but I've avoided them if possible because they looked so daunting and it felt like I wouldn't be able to decipher what they did without spending a few days reading the manpages for iptables and its related entries.
However, I knew enough theory on L2-L4 networking to know what should be possible. In fact, I knew in theory what could be done to meet my requirements. I had hoped that there were existing solutions that didn't involve me messing with iptables, but I couldn't find any. Knowing that iptables was likely the best way for me to turn theory into practice, I took the plunge and dived into iptables documentations for, surprisingly, just a few hours.
I won't explain iptables in this post. There are plenty of other articles that do a better job than I possibly could. A lot of guides focus on using iptables for firewalling rather than for general-purpose networking, but here are articles that do focus on the latter:
- Sudam Muhagamage's comprehensive guide on iptables
- Arch Wiki's iptables entry
- A 459-page book on general L3/L4 mechanics by Oskar Andreasson – possibly worth a read if you also need an intro on L3/L4
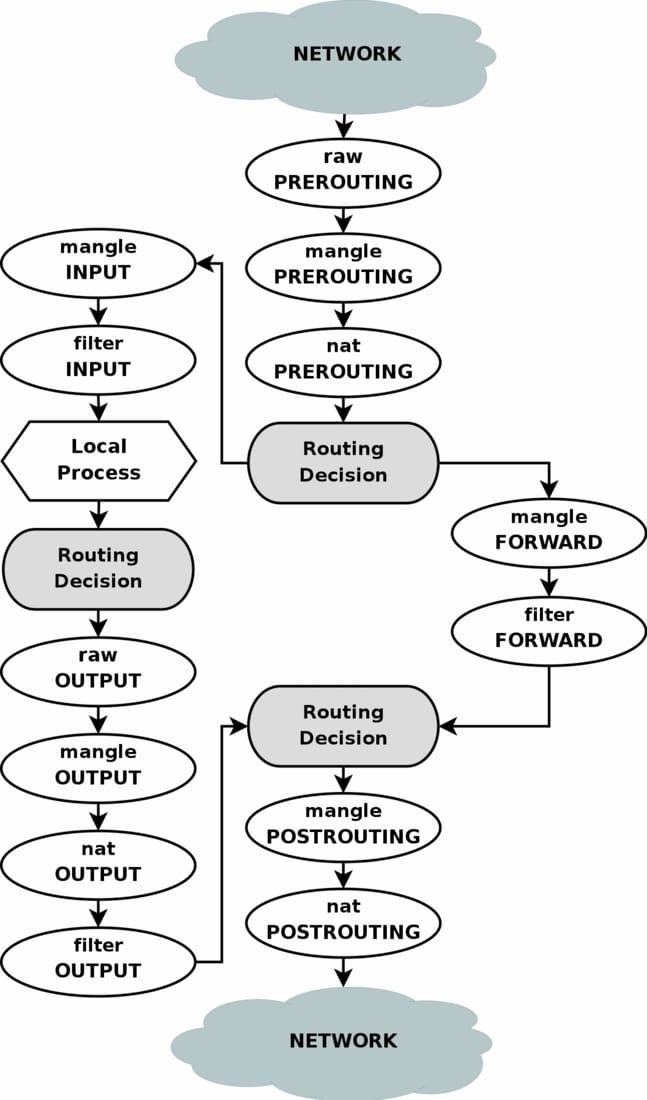
Here's another diagram I found on ServerFault that I find extremely helpful:
Diving in
Requirements
With the lengthy preamble out of the way, let's get down to business. First, we define what we want. We should be able to run a server (or servers) in a private home network (e.g. Minecraft) such that:
- Clients from the internet are able to connect to the server – e.g. Billy from across the globe can connect to the Minecraft server
- Extra configuration is not required for clients – e.g. we shouldn't require clients to connect to a VPN server
- We do not expose any ports on the router/we never have to share our home public IP address
- Client public IPs are preserved when reaching the server
Let's remind ourselves of some of the options that would normally work and why they don't fully meet our requirements.
FRP/SSH/Tunneling mechanisms
While this meets requirements 1-3, a fundamental feature of this is that they effectively SNAT the client's public IP – which we discussed in detail in the preamble – and violates requirement 4. Without the SNAT, reversing the traffic path would not work.
VPN Server
This option would require us to set up a VPN server that's connected to the private network and ask clients to activate a VPN whenever they want to connect to our server. This definitely violates requirement 2, and kind of violates requirement 4. While we wouldn't be getting the client's IP as it would be seen by the internet, we could have a VPN topology where the client's VPN IP effectively acts as the client's public IP, for all intents and purposes.
We might also violate requirement 3, depending where we place the VPN server. If we don't want to violate it, we could place a VPN server out of the private network that relays and acts as a router between peers external to the network and internal to the network.
The plan
As I mentioned before, I knew in theory what could be done to achieve the requirements. The theory is actually really simple: if you understand how your home router works, you already know the theory.
The router's role in a typical home network is to connect devices on the private network to the internet through a shared public IP. If we want others to be able to connect to a device in the private network, we port-forward a public port on the router to an address-port pair in the private network. Our requirements dictate that we don't do this because of security concerns, primarily that of exposing the router's public IP.
But what if we just had another router with disposable public IPs? Really, that's all this solution boils down to. We have a secondary router, Router B, that select devices on the private network connect to that does NAT for us and forwards traffic inbound to the router to devices on the private network. For security, we limit the devices that connect to Router B, limit the inbound traffic Router B forwards, and limit the inbound traffic to Router B in general. Since Router B has a different IP than our primary router, we never end up exposing our primary router's public IP. Additionally, since Router B is disposable, we can easily just toss it away and get a new public IP.
Sound too good to be true? Well, it kind of is. To illustrate the problems, we need to be more specific.
Brass Tacks
Suppose Router B has a public IP of 172.232.188.40 and we have a server that need to be exposed running on 10.4.4.32:25565 in the local network. The typical round-trip traffic would look like:
- A packet arrives to Router B from the internet:
src=80.3.4.5:7890, dst=172.232.188.40:25565. - Router B DNATs to
10.4.4.32:25565and forwards the packet to the local server, sending a packet likesrc=80.3.4.5:7890, dst=10.4.4.32:25565. - The server receives and processes the packet.
- The server will generate a packet
src=10.4.4.32:25565, dst=80.3.4.5:7890. - With some proper routing rules, this packet is forwarded to Router B.
- Router B SNATs to
172.232.188.40:25565and sends a packet likesrc=172.232.188.40:25565back to the internet, completing the round-trip.
This works fine, but what if we had multiple servers listening on the same port? For example, I might have a Minecraft server listening on port 25565 on a rack-mounted server, and another Minecraft server listening on the same port on a Raspberry Pi. When Router B receives a packet on port 25565, is it supposed to send it to the rack-mounted server or the Raspberry Pi?
One solution would be to just avoid port collisions globally within the home network for services that I want to expose. In fact, this is what's required if I want to port-forward on my fairly dumb home router. For most use cases, this will be fine, since you probably won't have that many ports to manage in the first place.
If you aren't able to avoid port collisions for whatever reason, here are some solutions:
Option 1: Port mapping
Supposing the rack-mounted server listens on 10.4.4.32:25565 and the Raspberry Pi listens on 10.4.4.33:25565, you could make it so that 172.32.188.40:25565 forwards to 10.4.4.32:25565 like usual, and then have 172.32.188.40:25566 forward to 10.4.4.33:25565.
The downside of this is that you have to maintain a manual port mapping, which can be tricky. For example, what if your Raspberry Pi needed to open up a service at 10.4.4.33:25566? It can't occupy 172.32.188.40:25566 because that's already forwarded to 10.4.4.33:25565, so you'd have to choose another port to listen on.
If you decide to go with this solution, I recommend "namespacing" port allocations so that for every IP device that you might want to expose, you allot a port range. So for example, my rack-mounted server might get the port range 25000-25100 on the public IP, and the Raspberry Pi might get the port range 25100-25200. Whenever an IP device needs to expose a service publicly, you'd assign a port in its port range to map to its private port.
Option 2: Multiple IP Addresses
Another solution is to have have a public IP address for each device you want to expose, giving you an entire port space for each device. For example, 172.232.188.40:25565 could forward to my rack-mounted server at 10.4.4.32:25565 and 172.232.188.41:25565 could forward to my Raspberry Pi at 10.4.4.33:25565. This is nice because it completely gets rid of port management, leaving you to only manage an IP mapping, which should be much easier. Additionally, a small side benefit of having multiple port spaces available is that it gives you a better chance of letting clients connect to services on their default ports.
However, there's a pretty big problem with this option: where the hell are you gonna get all these IP addresses?
We're running out of IPv4 addresses and a lot of work has been put into place to slow IPv4 address exhaustion down, including NAT between private and public networks. You might convince a cloud provider to give you an extra IPv4 address or two per VPS, but I'd be really surprised if they'd lend out any more than that for this use case. Sure, you can always rent more VPS's, but that can obviously cost quite a bit of money, alongside being harder to maintain since you'd have more routers.
IPv6, on the other hand, has a gargantuan address space. Cloud providers like Linode are willing to just hand out 64-bit wide IPv6 networks per Linode instance.
Chaff: Interestingly, it was actually Linode's support team that pointed me in the IPv6 direction. I'd always known a bit about IPv6 but I've pretty much always stuck with IPv4 for most of my networking career because I was just more familiar with it. When I opened a support ticket describing my use case and asking them if I could assign many IPv4 addresses per Linode instance, they politely declined and pointed me to some options I had, IPv6 being one of them. Overall, Linode's support team has been amazing to me and they have servers at very competitive pricing near me, which is why I settled with them. I'd post a referral link here but I haven't yet spent the $25 quota needed to create one.
Even though I had somewhat limited experience in IPv6 and was a bit skeptical because I wasn't sure how well-supported it was – even in 2025 – I decided I'd try option 2, managing multiple IPv6 addresses.
Brassier tacks
With a firm grasp on the theory and well-thought considerations on network topology, it's time to implement this.
One of the things I left out in my explanation is how my devices in the home network are going to connect to Router B, which will live in the cloud.
We need a virtual network that spans across the home network to the cloud, and it needs to be private.
Well, that's what VPNs are for! Specifically, we'll use Wireguard, a relatively new VPN technology that has support in the Linux kernel and boasts to be more secure and faster than predecessors like OpenVPN.
This is what our relevant network topology will look like:
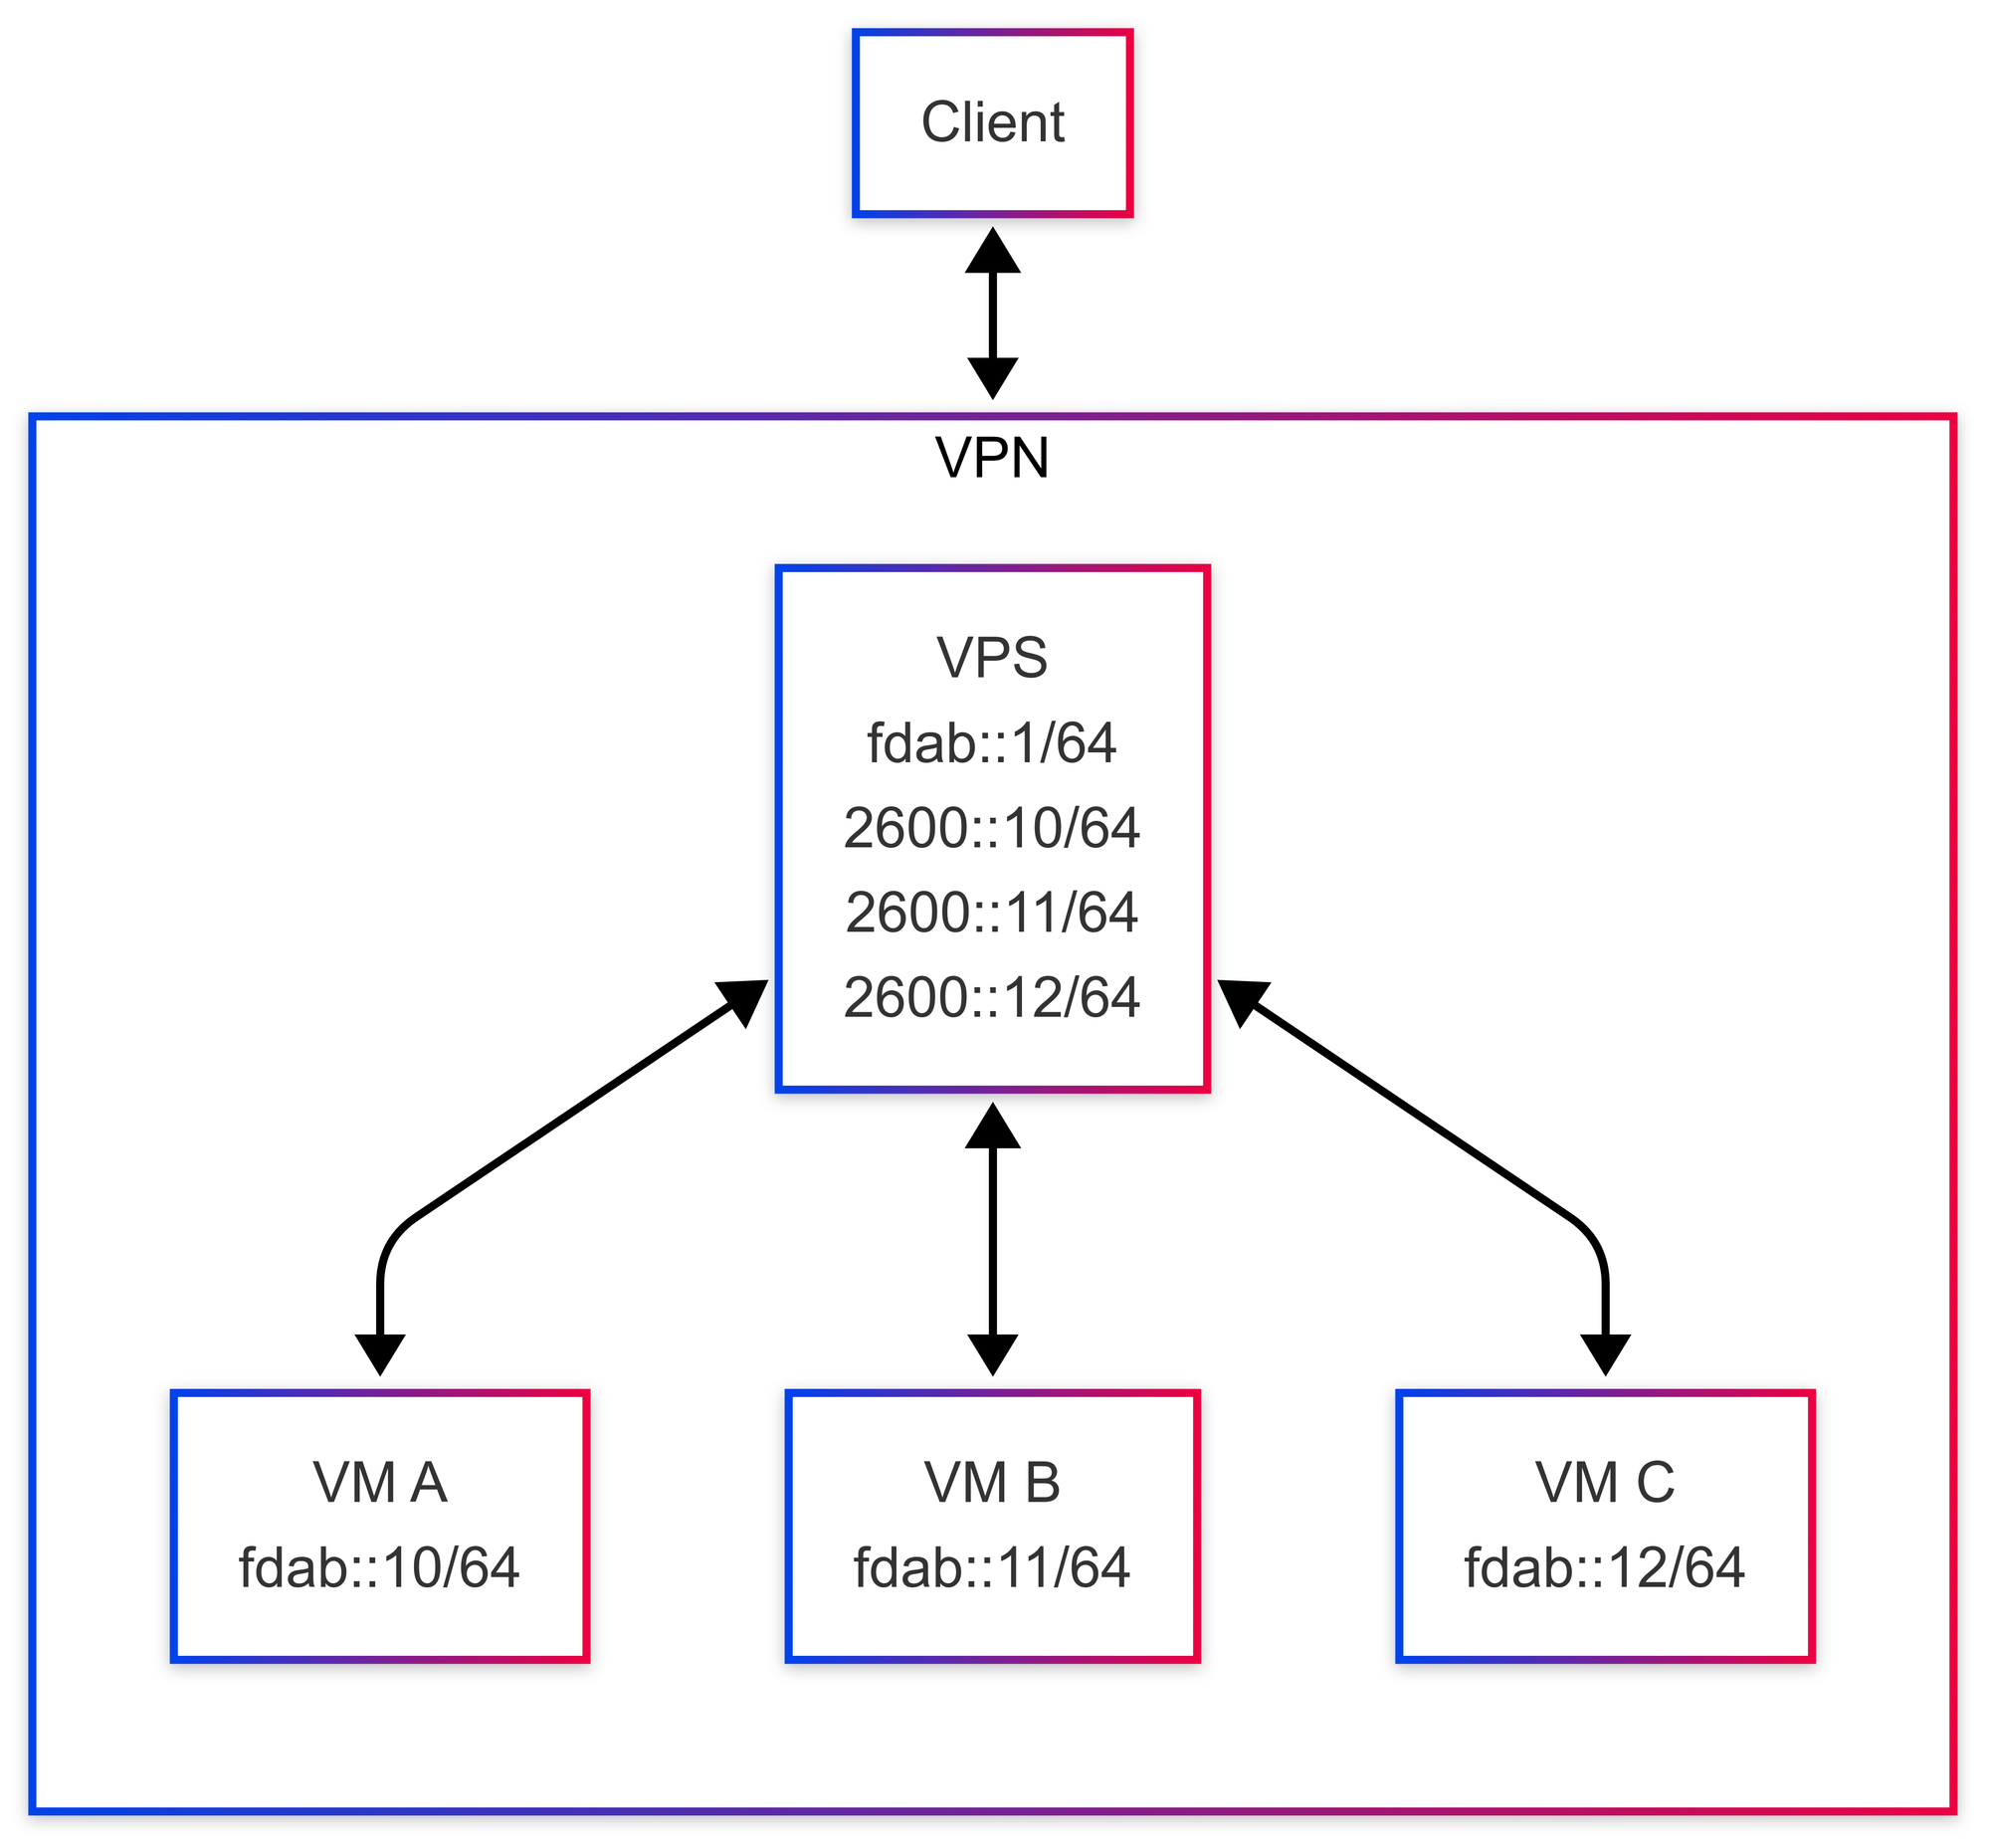
Note that many of the IPv6 addresses have been truncated for brevity. Also note the similarity in topology to your home network and the differences in NAT to the NAT on your home network.
To set this up, we need:
- Server(s) in our home network to forward to that you can SSH into
- A VPS with that ability to statically assign itself IPv6 addresses that you can SSH into
- An IPv6 address range for the Wireguard network (Wireguard being our VPN implementation of choice). Continue reading for recommendations on how to choose this.
I've already set up a few VMs using OpenTofu with my Proxmox server and I chose Linode as my cloud provider. Spinning up a Nanode instance on Ubuntu 24.04 with 1vCPU and 1GB of memory was more than enough for me. Here's Terraform/OpenTofu configuration if you want to follow my setup. Make sure to note the IPv6 range that was assigned to you for later.
variable "ssh_public_key_file" {
  # example = "~/.ssh/id_rsa.pub"
  type = string
}

# Get this from Linode:
# https://cloud.linode.com/profile/tokens
variable "linode_pat" {
  type      = string
  sensitive = true
}

terraform {
  required_providers {
    linode = {
      source  = "linode/linode"
      version = "2.34.1"
    }
  }
}

provider "linode" {
  token = var.linode_pat
}

resource "linode_sshkey" "mykey" {
  label   = "mykey"
  ssh_key = chomp(file(var.ssh_public_key_file))
}

resource "linode_instance" "embassy" {
  image           = "linode/ubuntu24.04"
  label           = "embassy"
  region          = "us-sea" # Choose whichever's closest to you
  type            = "g6-nanode-1"
  authorized_keys = [linode_sshkey.mykey.ssh_key]
}

# This assigns an IPv6 range to the instance, but not any
# addresses. We add addresses later.
resource "linode_ipv6_range" "embassy" {
  linode_id     = linode_instance.embassy.id
  prefix_length = 64
}

output "ipv6_subnet" {
  value = "${linode_ipv6_range.embassy.range}/${linode_ipv6_range.embassy.prefix_length}"
}
For 3., DigitalOcean recommends basing the IPv6 network off of a hash of the current time and the server's machine ID, which is what I did. For your convenience, I've shortened the steps into a single command to generate an IPv6 subnet.
printf "$(date +%s%N)$(cat /var/lib/dbus/machine-id)" |\
  sha1sum |\
  awk '{ print $1 }' |\
  cut -c 31- |\
  sed \
    -e 's/^/fd/' \
    -e 's/\(.\{4\}\)/\1:/g' \
    -e 's/:$/::\/64/'
You should get an output like this:
fdb4:f371:2e6c::/64DigitalOcean recommends to run this on your server for its machine ID, but it shouldn't really matter.
For the rest of post, we'll assume that:
- The primary network interface on all of the machines is
eth0 - All of the machines are running Ubuntu or are Debian-based
- The Wireguard IPv6 subnet you generated was:
fdab::/64 - The public IPv6 subnet you're given is:
2600::/64
VPS Setup
# Install wireguard
apt update && apt install -y wireguard

# Create public-private key pair
wg genkey | tee /etc/wireguard/private.key
chmod go= /etc/wireguard/private.key
cat /etc/wireguard/private.key | wg pubkey | tee /etc/wireguard/public.key
Create a file in /etc/wireguard/wg0.conf:
[Interface]
# First address on the IPv6 Wireguard network you generated earlier
Address = fdab::1/64
PrivateKey = <output of /etc/wireguard/private.key>
ListenPort = 51820

# Enable IP forwarding. Not sure if the ipv4/ip_forward is necessary,
# but I have it as an artifact from when I was testing with IPv4 and
# I now have a superstition that I need this.
PreUp = echo 1 > /proc/sys/net/ipv4/ip_forward
PreUp = echo 1 > /proc/sys/net/ipv6/conf/all/forwarding
# Disable autoconf while running. We assign some IP addresses that
# get removed by autoconf otherwise.
PreUp = echo 0 > /proc/sys/net/ipv6/conf/eth0/autoconf

# replace with a public IPv6 address you own
PostUp = ip -6 addr add 2600::10/64 dev eth0
# we'll forward ports 10000-10100 for demonstration, but
# **you should limit this**.
# additionally, if you want UDP, copy these lines and replace
# tcp with udp
PostUp = ip6tables -t nat -A PREROUTING -p tcp -d 2600::10 --dport 10000:10100 -j DNAT --to-destination fdab::10
PostUp = ip6tables -t nat -A POSTROUTING -p tcp -s fdab::10 -j SNAT --to-source 2600::10


# these should be the reverse of the commands above.
# so if you add/remove commands above, mirror them below, except replace
# "-A" with "-D" on the ip6tables commands and "add" with "del" on the
# ip commands.
PreDown = ip6tables -t nat -D POSTROUTING -p tcp -s fdab::10 -j SNAT --to-source 2600::10
PreDown = ip6tables -t nat -D PREROUTING -p tcp -d 2600::10 --dport 10000:10100 -j DNAT --to-destination fdab::10
PreDown = ip -6 addr del 2600::10 dev eth0
PostDown = echo 1 > /proc/sys/net/ipv6/conf/eth0/autoconf
PostDown = echo 0 > /proc/sys/net/ipv6/conf/all/forwarding
PostDown = echo 0 > /proc/sys/net/ipv4/ip_forward

[Peer]
PublicKey = <fill this in later>
AllowedIPs = fdab::10/128
# recommended if this peer is behind a NAT (it probably is)
# consider lowering this if the tunnel breaks every once in a while
PersistentKeepalive = 30
Again, I won't go into too much detail explaining the iptables commands. You can refer to the resources I linked earlier if you're interested. On a high level, all this does is:
- Makes your VPS listen on a IPv6 address
2600::10. - Forward TCP traffic on
2600::10to a Wireguard peer onfdab::10(we'll set the peer up later). - Forward TCP traffic from
fdab::10to the public IPv6 address on2600::10
Local VM Setup
Similar to the VPS, we need to install Wireguard and generate some keys.
# Install wireguard
apt update && apt install -y wireguard

# Create public-private key pair
wg genkey | tee /etc/wireguard/private.key
chmod go= /etc/wireguard/private.key
cat /etc/wireguard/private.key | wg pubkey | tee /etc/wireguard/public.key
Create a file in /etc/wireguard/wg0.conf:
[Interface]
Address = fdab::10/64
PrivateKey = <output of /etc/wireguard/private.key>
ListenPort = 51820
# Outbound IPv6 traffic will by default by routed through the Wireguard
# tunnel through the AllowedIPs configuration below.
# In my case, I seemed to have a route already added that
# routes local traffic properly, but if you don't, consider adding
# these.
# PreUp = ip route add <local network> dev eth0 proto static
# PostDown = ip route del <local network> dev eth0 proto static

[Peer]
PublicKey = <the public key on your *VPS*>
AllowedIPs = ::0/0
PersistentKeepalive = 30
# You can use an IPv4 address here if you want
Endpoint = <VPS IP>:51820
Finally, don't forget to copy the public key you generated on your local VM and set it on the VPS configuration:
...
[Peer]
PublicKey = <you can fill this in now>
AllowedIPs = fdab::10/128
# recommended if this peer is behind a NAT (it probably is)
PersistentKeepalive = 30
Remark on multiple VMs
If you have multiple VMs, you'd have to add more entries on the VPS's /etc/wireguard/wg0.conf:
...
PreUp = echo 1 > /proc/sys/net/ipv4/ip_forward
PreUp = echo 1 > /proc/sys/net/ipv6/conf/all/forwarding

# === Copy and paste this block for each VM ===
# ===   Don't forget to replace addresses   ===
PostUp = ip -6 addr add 2600::10/64 dev eth0
PostUp = ip6tables -t nat -A PREROUTING -p tcp -d 2600::10 --dport 10000:10100 -j DNAT --to-destination fdab::10
PostUp = ip6tables -t nat -A POSTROUTING -p tcp -s fdab::10 -j SNAT --to-source 2600::10
# =============================================

# =========== Same with this block ============
PreDown = ip6tables -t nat -D POSTROUTING -p tcp -s fdab::10 -j SNAT --to-source 2600::10
PreDown = ip6tables -t nat -D PREROUTING -p tcp -d 2600::10 --dport 10000:10100 -j DNAT --to-destination fdab::10
PreDown = ip -6 addr del 2600::10 dev eth0
# =============================================

PostDown = echo 0 > /proc/sys/net/ipv6/conf/all/forwarding
PostDown = echo 0 > /proc/sys/net/ipv4/ip_forward
...

# =========== Same with this block ============
[Peer]
PublicKey = <fill this in later>
AllowedIPs = fdab::10/128
PersistentKeepalive = 30
# =============================================
Bringing it together
On each of your hosts, run systemctl start wg-quick@wg0. For a post-flight checklist, I recommend doing the following tests:
Sanity check
Try pinging between your clients and servers: ping6 fdab::10. If this doesn't work, then Wireguard likely has not established a tunnel, which you can check with wg show.
Check outbound NAT works
On VPN clients, curl -6 ifconfig.me. It should match a public IPv6 address of your VPS (e.g. 2600::10). If this doesn't work but Wireguard has established the tunnel, then something is wrong with the iptables configuration.
Check inbound NAT works
On a VPN client, continually listen on a TCP port with:
while true; do nc -vnlp 10000; doneOn different machine (ideally one not in your home network to prevent potential routing issues),
nc -vn <public IPv6 matching that VPN client> 10000If all goes well, you should be able to establish a TCP connection and start communicating with netcat.
If you're unable to establish a connection, I don't have a quick solution other than to start monitoring traffic on both your VPS and on your VM with tcpdump -ni wg0 -p tcp port 10000 and even tcpdump -ni eth0 -p tcp port 10000 on your VM, in case it turns out that outbound packets on the VM are being routed incorrectly. You'll have to read the traffic flow and diagnose what's going wrong based on which packets are arriving on which interfaces – or if they aren't.
Otherwise, if all of these checks succeed, you should be able to open arbitrary TCP ports on your VMs and expose it via the VPS! Of course, you should limit what's exposed on your VMs and limit what's forwarded/accepted on the VPS. If you want UDP (many games will probably need this), the /etc/wireguard/wg0.conf configuration on the VPS needs to be adjusted accordingly (I've already marked what needs to be changed).
Finally, if you're sure that this configuration works, then you can run systemctl enable wg-quick@wg0 on all your hosts. We didn't do this earlier in case somehow turning on the service blocked us from connecting to a host. By not enabling the service, we'd still be able to just restart the machine to wipe the ephemeral configuration in case things went wrong.
Of course, if you plan to scale up/down the number of local VMs, you should probably write a script to do this for you. Personally, I've created a Terraform/OpenTofu module that chains into an Ansible playbook making use of a Wireguard role that Githubixx wrote, which I may release in the future.
Next steps
We've configured a VPS as a secondary router that NATs traffic for us over a Wireguard network, which is pretty awesome. Of course, what I set up is way overkill for the average person who just wants to run a Minecraft server for their friends. At the same time though, this really wasn't that hard to implement, nor is it actually that complicated in theory once you break it down. At any rate, FRP would be a solid option for most people. Seriously, FRP looks awesome and I want to give it a try and write another blog post on it or even make a video giving it much-needed spotlight.
The configuration I gave is mostly secure, but I'd definitely tighten up the ports that the VPS forwards for, as well as making sure a firewall is enabled – either by your cloud provider or on the VPS itself through something like ufw (or even through iptables 😉). I'd also be absolutely sure that the range of ports that the VPS forwards for on each VM are closed, except for the ones that explicitly should be open. Even better, you could forward individual ports, one for each that you need to open, rather than forwarding port ranges.
It might be worth looking into traffic limiting as well. Linode only gives a certain amount of bandwidth per month, meaning an attacker could flood the VPS and take down networking for the remaining month. I currently don't know any great solutions to this. Whitelisting IPs is too inflexible and manual for my needs, and limiting bandwidth per connection seems like it would be either too restrictive per connection, or too loose to prevent any competent attacker from flooding the VPS. Fortunately, this isn't a problem I've run into yet.
You could also set up some monitoring on the traffic that's being forwarded on the VPS with something like Promtail, Loki, and Grafana. You could even send it back into your home network, which shouldn't be too hard since you're already connected through the Wireguard tunnel.
You could also set up dynamic policy-based routing, where your VMs will only send packets through the Wireguard tunnel as a response, rather than blindly sending all traffic through the tunnel. This may be advantageous in cases where you want your VMs to use your primary router by default, but only respond to client requests to your server. I personally wasn't able to get this working completely, only being able to support TCP, not UDP. It might be fun to do this as a challenge using iptables and conntrack, but I'm not sure I'd recommend this, since you're probably going to throw off STUN binding results and possibly expose your primary router's IP through STUN/ICE exchanges if you have this split policy.
For me, I'm gonna be monitoring how well this works for the next while, focusing on the IPv6 aspect of it. While I haven't run into any problems so far, I can't be sure of its stability just yet.
In any case, I hope you enjoyed this post and got something out of it. It was a blast playing around with networking like this and discovering the sheer power of iptables.
No compromises: How I exposed services securely through a secondary router
Networking fun with a guide on securely setting up a secondary router acting as a public-facing server for services that aren't L7-proxyable.